Reverse Osmosis Installation Cost: DIY or Plumber?
Reverse osmosis system installation cost depends on labor, extra parts, and any faucet or plumbing changes your kitchen needs. DIY avoids installation labor, but compare complete quotes and check what comes with the system before buying extras.
On this page (8 sections)
- What affects reverse osmosis system installation cost?
- Is DIY installation less expensive than hiring a plumber?
- When should you hire a plumber?
- Which system features can reduce installation work?
- What should a plumber quote include?
- Which installation mistakes create avoidable work?
- What should you check after installation?
- How should you decide what to spend on installation?
Reverse osmosis system installation cost depends on labor, extra parts, and faucet or plumbing changes. DIY avoids an installer's labor charge, but it can still require tools, adapters, and time.
A kitchen with a suitable faucet opening and accessible connections needs less work than one with damaged valves or a crowded drain assembly. Build your budget around those differences, and keep the system purchase separate from installation.
What affects reverse osmosis system installation cost?
The main cost drivers are faucet access, supply plumbing, drain routing, and cabinet space. Check each before buying a system or requesting an installation quote.
An unused sink opening can save a drilling step if it fits the faucet. A new hole in stone or another hard surface may require a separate countertop specialist, so confirm who handles that work.
The cold-water shutoff must work and accept the correct feed connection. Replacing a damaged valve or altering rigid pipe adds work beyond connecting the RO system.
The drain needs an approved connection that matches the system's tubing and faucet arrangement. A disposal, dishwasher hose, or unusual drain layout can affect which parts fit.
Measure cabinet clearance with the disposal, shelves, and cleaning supplies in place. Leave room to reach fittings and remove filter housings, plus space for a storage tank when the system uses one.
For help choosing a system that suits those limits, use our under-sink water filter and RO guide.
Is DIY installation less expensive than hiring a plumber?
DIY saves installation labor when the job uses existing connections and needs no specialist work. The savings shrink if you need tools you'll rarely use or must hire someone to correct an unfinished connection.
Read the full manual before deciding. Identify every required connection, check the included parts, and confirm that local rules and any rental agreement allow the work.
Make a short shopping list from actual measurements. Separate essential parts from optional additions, such as a refrigerator line, so an extra project doesn't inflate the basic installation budget.
How do you plan a DIY reverse osmosis installation budget?
Budget for missing parts, required tools, and startup time, with the system itself recorded separately. Check what is already included before buying a second drain fitting or feed adapter.
ESHIONG Push-Fit Fittings suit a compatible tubing extension or repair. The kit contains 20 fittings and 30 ft of 1/4 in tubing, making it more useful for several connections than a single short replacement.
Skip this kit if your line uses a different diameter or you need a threaded supply adapter. For one small repair, a correctly sized individual part may leave fewer unused pieces.
Push-fit connections still need clean, square tubing ends and full insertion to the depth specified by the fitting instructions. Don't force a damaged or mismatched tube into a connector.
Follow our guide to how to install a reverse osmosis system to compare the work with your skills before shutting off the water.
When should you hire a plumber?
Hire a plumber for damaged supply plumbing, unfamiliar pipe changes, or a drain connection you can't complete correctly. Arrange specialist help for countertop drilling when the installer doesn't provide it.
Send cabinet photos, the system model, and its manual when requesting a quote. Include the faucet opening, shutoff valve, disposal, and dishwasher hose so the installer can assess access.
For a disposal-based drain route, the Watts Drain Adapter Kit suits compatible 3/8 in RO drain tubing and air-gap faucet arrangements. It includes an adapter, hose coupler, and 2 stainless steel clamps, and connects without drilling existing plumbing.
Choose it when your disposal and hose layout match its instructions. Skip it when you have no disposal or the RO drain arrangement requires a different connection; “universal” doesn't remove the need to measure.
The SDTC Drain Saddle Valve suits a permitted saddle connection on a 40–50 mm outside-diameter pipe. It has a 1/4 in quick-connect fitting and includes bolts, nuts, and clamps.
Choose the saddle only when the pipe size and system instructions match. Skip it for a different pipe diameter, a different drain-tube size, or a layout that needs another drain method.
These are alternative connection approaches, so don't automatically buy both. Our guide to installing an under-sink water filter explains the plumbing tasks to discuss with an installer.
Which system features can reduce installation work?
Features that improve faucet access and connection fit can simplify installation. They won't solve a missing countertop opening or damaged plumbing.
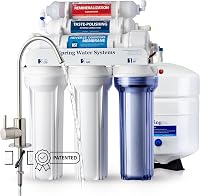
The iSpring RCC7AK-BN suits buyers who want a complete under-sink RO system with remineralization. It includes a brushed nickel faucet and storage tank, and operates without electricity.
Its top-mounted faucet fastener allows tightening from above the counter. That helps when reaching behind a sink basin would make a conventional mounting nut awkward.
The system also has quick-fitting connections and a convertible feed adapter for 1/2 in NPT and 3/8 in compression fittings. Confirm your actual valve connection rather than choosing by appearance.
Skip it if your cabinet can't accommodate the filter assembly and separate tank with service access. It also isn't the right purchase if you only need a drain fitting for an existing system.
Use our guide to choosing a reverse osmosis system for your kitchen before letting one convenient installation feature decide the whole purchase.
What should a plumber quote include?
A useful quote defines the complete job and its exclusions, with labor and materials separated. Compare quotes for the same scope rather than comparing headline totals.
Ask for these items in writing:
- Faucet mounting and responsibility for any new hole.
- Feed-water connection and any shutoff-valve repair.
- Drain connection method and required fittings.
- Filter assembly and tank placement, where applicable.
- Startup flushing and leak checks.
- Charges for extra work or a return visit.
Confirm whether the installer supplies the system and fittings or expects you to provide them. If you're supplying parts, have the installer confirm compatibility before the appointment.
Also ask how changes discovered during the job will be approved. That gives you a clear stopping point before work expands beyond the agreed installation.
Which installation mistakes create avoidable work?
The most avoidable mistakes are buying parts before measuring and leaving connections hard to reach. A simple layout plan helps prevent both.
Don't treat all RO tubing as interchangeable. Feed, drinking-water, and drain connections may use different sizes, and an adapter must match the specific connection.
Keep tubing away from sharp edges and moving storage bins. Avoid tight bends, leave sensible service slack, and support longer runs according to the system instructions.
For a drain saddle, follow the required position and align the opening correctly. For an air-gap faucet, route its drain tubing as directed, without kinks or low loops that can trap water.
Don't overtighten plastic housings or fittings to stop a leak. Shut off the supply, relieve pressure as directed, and identify whether the seal, tubing end, or connection needs attention.
Avoid adding a refrigerator connection until the basic system works correctly. Treat that branch as a separate compatibility check, including the appliance's water-supply requirements.
What should you check after installation?
Complete startup flushing and leak checks before regular use. Follow the system manual for the flush sequence and any water that must be discarded.
Dry the cabinet, then inspect the feed connection, housings, tubing joints, faucet connections, and drain fitting. Check again while the system refills, and after it has sat unused, since a dry first check isn't the end of startup.
Keep the shutoff accessible and record the installation date. Save the manual and note any added fittings so future repairs don't depend on guessing what was installed.
For ongoing care, follow the replacement schedule rather than relying on water appearance or taste alone. Our guide to how long reverse osmosis filters last explains the factors that affect replacement timing.
If water appears in the cabinet, shut off the supply and find its source before resuming use. Use our guide to why a reverse osmosis system may leak to narrow down the problem.
How should you decide what to spend on installation?
Base your reverse osmosis system installation cost decision on the work your kitchen needs. Choose DIY when the connections match, access is clear, and you can complete every step in the manual.
Choose a plumber when valves need repair, the drain route is unfamiliar, or the faucet needs work beyond your skills. Have countertop drilling assigned to a qualified person before booking the rest of the job.
Buy the ESHIONG kit for compatible tubing work, the Watts adapter for a suitable disposal route, or the SDTC saddle for a correctly sized, permitted saddle connection. Choose the iSpring system when you need the complete unit and have room for its tank.
Keep installation and future filter care as separate budget items. For the broader ownership decision, see how much a reverse osmosis system costs.
Frequently asked questions
How much does it cost to install a reverse osmosis system?
Reverse osmosis installation cost depends on local labor charges, the faucet opening, supply fittings, and drain connection. Separate the system purchase from installation, then request an itemized quote covering labor, extra parts, drilling, startup flushing, and leak checks so you can compare the same work across installers.
Can I install a reverse osmosis system myself?
DIY is practical when the manual matches your plumbing, the shutoff works, and you have the tools and skills required. Check the faucet opening, cabinet clearance, and drain route before starting, and hire a plumber for damaged plumbing or changes you don't know how to make.
Does a reverse osmosis system need a separate faucet?
Many under-sink RO systems use a dedicated faucet that needs a suitable sink or countertop opening. An unused opening may avoid drilling, but measure it against the faucet instructions and check clearance below it; a top-mounted fastener still needs the correct hole and enough room for tubing.
Is a plumber worth it for reverse osmosis installation?
A plumber is worth considering when installation involves a new faucet hole, a difficult drain route, or damaged supply plumbing. Ask who handles countertop drilling and what the quote includes, then compare that scope with the tools, parts, time, and skill a DIY installation would require.